Bismillah. This is the fourth article in the Forge series! In the previous post, we learned how to add audio to our games using the Audio package. Today, we’ll take our interactivity to the next level by learning how to handle input in Forge.
Forge offers two main approaches to handling input events: callbacks (event-driven) and polling (state-driven). Both have their advantages and knowing when to use which will help you write cleaner, more responsive code.
Understanding Input in Forge ⚙️
Input handling is at the heart of every interactive application. Whether you’re making a platformer, a puzzle game, or a little experiment, you’ll be constantly reacting to user input.
Forge provides an input system that can be accessed via driver.Input. You can either poll keys every frame or register callbacks for specific actions.
Let’s compare both methods quickly:
Method
Description
When to Use
Example
Device
Polling
You manually check key states each frame IsKeyPressed()
Continuous movement or actions that need to update per frame
Character movement
Keyboard, Mouse
Callbacks
Forge calls your function when an event occurs SetKeyCallback()
Single actions or events
Menu navigation, quitting on ESC
Keyboard, Mouse
In this tutorial, we’ll use polling to move two players on screen, one using WASD keys and another using the arrow keys. We’ll also use a callback to handle the Escape key to close our game window.
Unfortunately, I wasn’t able to show a complete example on how to use the mouse button polls and callbacks, we’ll keep that for another tutorial!
Project Setup 🧱
We’ll start from the ForgeStarterTemplate. Clone it using:
git clone https://github.com/ForgeLeaf/ForgeStarterTemplate.git
cd ForgeStarterTemplate
Now open main.go and change the window configuration in the main() method:
We’ll create a new file called player.go and define our player logic there.
Each player will have:
a position and velocity
a speed value
a texture
key bindings for movement
We’ll also create three methods:
input(driver) for key input (polling)
logic(delta) to update the position
draw(batch) to draw the sprite
Here’s what the beginning of the file looks like:
type Player struct {
	position mgl32.Vec2
	velocity mgl32.Vec2
	speed    float32
	texture  *Graphics.Texture
	keyUp, keyDown, keyLeft, keyRight Input.Key
}
Polling Input Each Frame ⌨️
Inside our input() method, we’ll reset the velocity and check each direction key:
func (player *Player) input(driver *Forge.Driver) {
	player.velocity[0] = 0
	player.velocity[1] = 0

	if driver.Input.IsKeyPressed(player.keyUp) {
		player.velocity[1]++
	}
	if driver.Input.IsKeyPressed(player.keyDown) {
		player.velocity[1]--
	}
	if driver.Input.IsKeyPressed(player.keyLeft) {
		player.velocity[0]--
	}
	if driver.Input.IsKeyPressed(player.keyRight) {
		player.velocity[0]++
	}

	player.velocity.Normalize()
}
This method is called every frame, and we’ll later multiply velocity by speed * delta in logic().
Creating Our Game Scene 🧩
Now let’s create and open our game file: game.go
We’ll define our implementation of the game there (instead of Application in main.go), so go ahead and clean your main.go file and move the Application struct to the game.go file, and rename it to Game. It should look like this:
We’ll first define our game objects in the struct:
batch should be our main sprite batch for rendering.
viewport should be our main viewport of the world.
goblin represents our first player.
werewolf represents our second player.
I’ll save you the headache and tell you that it should like this:
type Game struct {
	batch    *Graphics.Batch
	viewport *Viewports.FitViewport

	goblin   *Player
	werewolf *Player
}
Don’t forget to import the packages github.com/ForgeLeaf/Forge/Graphics and github.com/ForgeLeaf/Forge/Graphics/Viewports and running go mod tidy to fetch them.
So, back to coding, we’ll create our batch, viewport, and players in the Create() method:
Basically, we just tell the batch to draw the player texture at the current player position and we set the width and height of the rendered rectangle to 2×2 world-units.
Now all that’s left is to implement our constructor, the NewPlayer method, which takes in:
x and y as initial coordinates/position.
texture for the player texture
keyUp, keyDown, keyLeft, and keyRight as mappings for movement input keys.
We want all players to have the same speed, so we’ll skip it here for now.
That’s done! Now, to our Destroy() method, we need to dispose the player textures and our main batch, which can easily be achievied using this snippet:
And that’s done too! Now all that’s left is to implement our Render() method. We’ll implement it like a real production-ready game does it. A render-cycle should, in the same order:
Handle the input
Update the logic
Draw the entities
And we’ll apply that exact same principal here. We’ve conveniently created the input, logic, and draw methods in our player.go, so it’s basically just a matter of connecting it to our game loop.
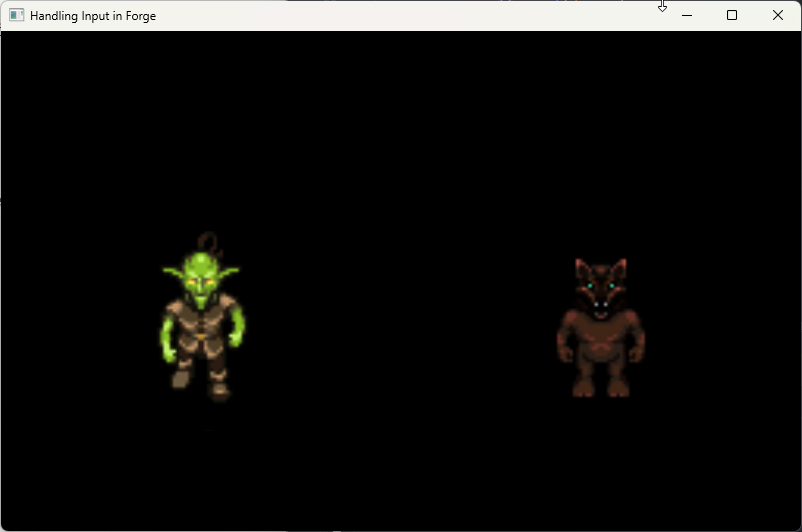
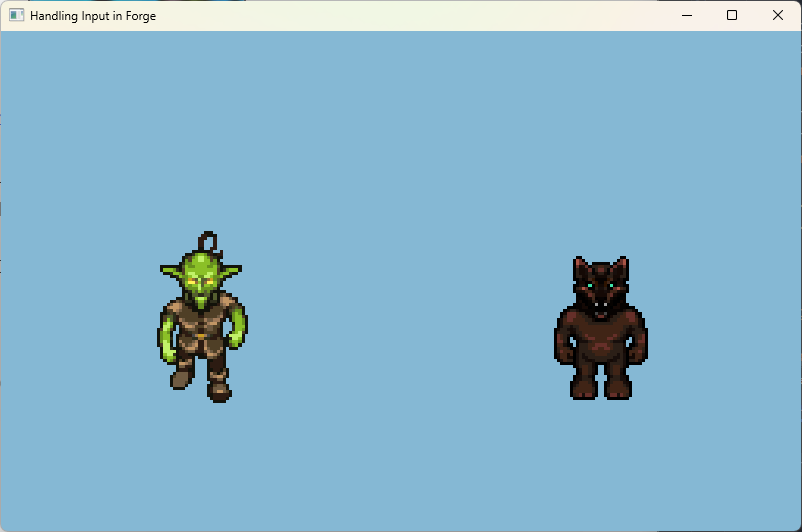
Finally, now, if you launch the game, it should look similar to this:
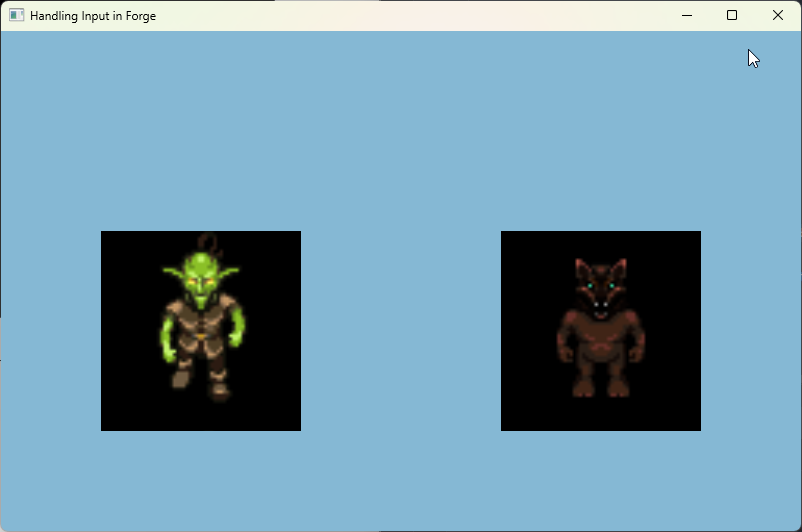
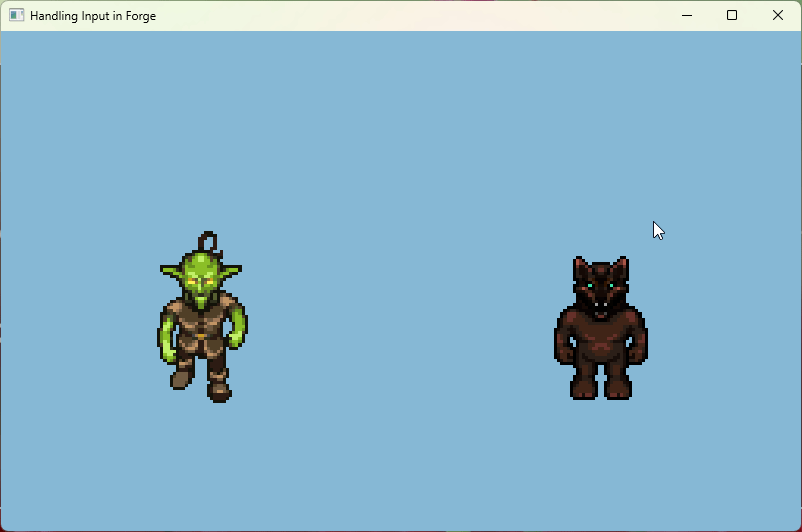
Cool right? We can already see our player! Let’s give the background a nice blue-ish color like our beautiful sky:
gl.ClearColor(0.52, 0.72, 0.83, 1)
And it should already look somewhat better:
But wait, what are these black boxes there? Let’s fix it!
Fixing the Black Boxes ⬛
In video game development, you’ll often come across drawing optimization techniques and you’ll hear the word “Blending” alot.
What is blending? It’s an advanced topic that we’ll keep for later but if you’re excited enough to read about it today, here’s a nice article I’d recommend.
Blending is the way of telling the renderer how to render stacked objects, for example: Should it have transparency? Or just ignore it? Should it do something different like clip the objects or complete remove the pixel or whatever.
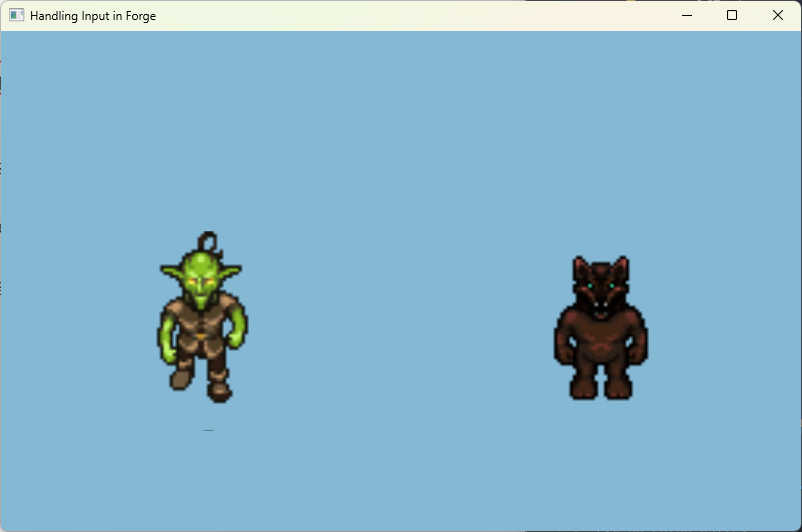
There are many different blending configurations. For now, we’ll basically just enable and use the simplest blending configuration by adding this snippet of code at the end of our Create() method:
And don’t forget to import the right go-gl package and to run go mod tidy to fetch it:
import "github.com/go-gl/gl/v3.3-core/gl"
Should already look much better:
But the sprites look blurry, why? Let’s fix that too!
Fixing the Blurry Textures
The GPU uses algorithms to scale textures and most game libraries and frameworks default to what’s called bilinear-filtering, a texture-filter that linearly interpolates between the pixel color values to find the most suitable color for a scaled texture.
So, if it’s the most suitable color, why does it look blurry you may ask? It’s because our assets are pixel-art and pixel-art prefers to look sharp in some way. Drawing pixel-art means you’re working with a small canvas size and scaling it to the 10x will result it textures looking too blurry.
The solution? It’s to use a different commonly used texture-filter called nearest-filtering, which works a bit differently and produced pixelated instead of blurred outputs.
Here’s a nice comparison I got from the LearnOpenGL forum:
So, when create our player textures, we use the provided SetFilter(min, mag) method to change the filter of our texture, for the goblin it’s:
goblinTexture.SetFilter(gl.NEAREST, gl.NEAREST)
and for our werewolf it’s:
werewolfTexture.SetFilter(gl.NEAREST, gl.NEAREST)
Run the game and it should look much, much better:
Adding an ESC-Callback 🚦
Lastly, to say that we used a key callback in Forge, we’ll tell our driver to stop the game whenever we press the escape-key (ESC), so go ahead to the end of your Create() method and add this snippet of code:
Compare it to your version and tell me if it works! That’s it! You’ve successfully drawn your first texture with Forge. If you’ve faced any issues, please message me using the form below.
🐺Werewolf.png was created by Stephen Challener (Redshrike), William Thompson (William.Thompsonj), & Jordan Irwin (AntumDeluge) and obtained from OpenGameArt.org.
💚Goblin.png was created by Stephen Challener (Redshrike) & William Thompson (William.Thompsonj) and obtained from OpenGameArt.org.
Common Issues
If you’re getting a black screen:
Check if you imported the image/png package.
Check if you’re rendering within batch.Begin() and batch.End().
Check if you’re applying the viewport projection to the batch.
If the code isn’t compiling:
Check if you’ve misspelled any imports.
Run go mod tidy and rebuild.
Clear IDE cache.
Check for syntax errors.
If your program is crashing before rendering anything:
Check whether you’ve imported the correct go-gl version or not (Correct one is go-gl/gl/v3.3-core/gl).
If you’re facing any other issues, contact me below!
Give us some feedback!
Thanks for reading our article. Could you please consider giving us some constructive, anonymous feedback?
Salam everyone! Today I’m introducing a small but powerful library for LibGDX: simple-save-gdx.It helps you serialize and deserialize your game’s data or state classes in a simple, lightweight way. No…
Bismillah, dear readers!I hope you enjoyed the long weekend and managed to recharge. Today we’ll explore building a simple game using simple‑world‑gdx (my lightweight ECS for LibGDX), together with simple‑batch‑gdx…
Bismillah.Today, we’ll take a short detour from Forge and look at something written purely for LibGDX, a little helper library called SimpleBatch. If you’ve used LibGDX for any length of…
Forge is our free and open source game framework for the GoLang programming language. It is feature-rich and constantly improved. We designed Forge to be performant and simple for beginner, its power lies within its ecosystem and community. Forge is lightweight in nature and can be easily extended to fit most of your needs. Write you game logic in your way and let the framework handle compatibility.