This is my second article in the Forge series. In the previous post, we covered how to set up the starter template and get a simple application running.
Today, we’ll take it a step further and draw our first texture to the screen using the Forge framework.
Setting Up the Project 🏗️
We’ll start by cloning the Forge Starter Template. It provides a clean base for new projects:
git clone https://github.com/ForgeLeaf/ForgeStarterTemplate.git
cd ForgeStarterTemplate
Inside the folder, you’ll see a familiar structure. We’ll create an assets/ directory where we’ll place our image, you may do that using mkdir assets or from within your IDE.
The method takes in a filePath as parameter, we’ll pass the relative path to our logo asset here. Notice that it returns two objects: a texture object, and an optional error. We may capture the error for debugging but it’s not necessary in our case, that’s why I renamed the optional parameter to an underscore instead of err.
Before continuing, you’ll have to add the following imports for this to work:
import _ image/png –> This is used to enable the texture loader to decode the PNG format.
import github.com/ForgeLeaf/Forge/Graphics –> This allows us to use the Graphics package.
Now that we’ve loaded our texture into the GPU (The NewTexture does this for us), we’ll need to create a batch instance to render it. The batch is what allows us to easily render textures, texture regions, shapes, and much more using simple method calls.
You can instantiate a new batch using Graphics.NewBatch(driver), we’ll do that instantly after loading the texture:
application.batch = Graphics.NewBatch(driver)
The driver argument is the same parameter that we get from our Create() method.
Setting up the Viewport 🪟
We’ve already loaded our texture and instantiated the batch for rendering, all we have to do now is to specify where we want to render our texture to. We could do that by creating a so-called Camera, but that’s a bit hard to manage for beginners and not recommended. Our solution is to use a Viewport, there are many kinds of viewports and future tutorials will showcase all the built-in ones.
The viewport manages our camera and fixes the headache that comes with resizing, it also allows us to define our space using our own world-units (for ex. 100 pixels = 1 world-unit). For now, we’ll use a ScreenViewport, which maps 1 world-unit to 1 pixel on the screen.
We’ll create our viewport after the batch within our Create() method aswell:
The first two lines clear the screen with a black background.
We apply the viewport and camera projection.
batch.Begin() starts the drawing phase.
batch.Draw(...) renders our image stretched to the window size.
batch.End() finishes and submits the draw calls to the GPU.
Before running the code, you’ll have to import the go-gl package to actually use the gl API (first two lines in the method above), you’ll do that by importing this package:
import "github.com/go-gl/gl/v3.3-core/gl"
You may have to run the following command for your environment to fetch the required libraries:
go mod tidy
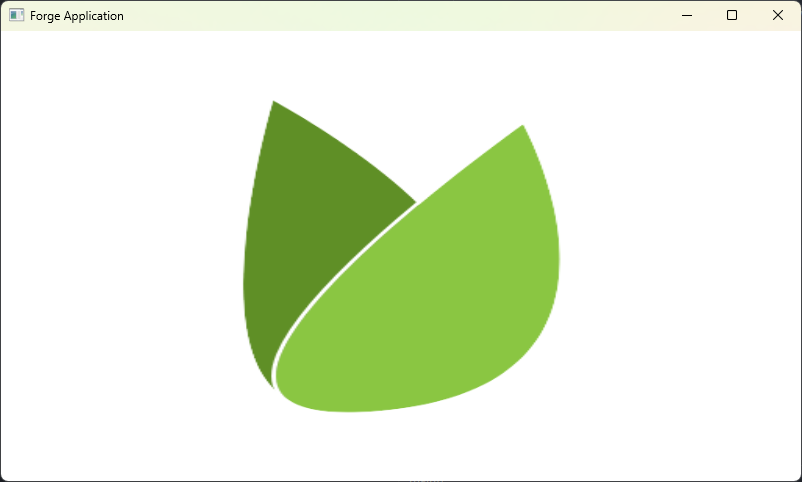
It looks stretched, right? We have several ways to fix this, the most simple one is to just resize our window to have the same dimensions as the our image. We’ll do that by modifying the configuration passed to the initial Forge.RunSafe(...) call in our main() method.
Change your main() method to look like this:
func main() {
	config := Forge.DefaultDesktopConfig()
	config.Title = "Drawing your first texture using Forge"
	config.Width = 512
	config.Height = 512
	config.Resizable = false
	if err := Forge.RunSafe(&Application{}, config); err != nil {
		panic(err)
	}
}
To break it down:
We first get ourselves the default desktop config
We change the initial window title to “Drawing your first texture using Forge”
We set the initial window width and height to 512 (pixels)
We make the window unresizable
We give our config to Forge and let it run our application safely.
Alright, now you’ll get something that at least doesn’t look stretched:
Handling Resize Events 🔃
Our current solution worked, but it’s not really ideal to prevent the window from resizing. If you’d like to keep the window resizable and instead provide your own solution, we’d recommend you use a different viewport or unlink the rendering bounds from the window dimensions.
A viewport has to always be notified about resize events. Luckily, Forge has a resize callback called Resize(), just add this snippet to update your viewports’ internal dimension:
application.viewport.Update(width, height, true)
That’ll fix many rendering issues that you’ll set in your journey.
Cleanup 🧹
The objects we created aren’t managed by the GC and it’s our responsibilty to dispose them. Texture, for example, are saved on the GPU and have to be removed manually.
Forge includes a handy Dispose() method in all objects that have to be manually disposed. These are mainly graphics objects that use the GPU directly, in our case it’s the logo texture and our batch instance (the batch has internal shaders uploaded to the GPU).
Within your dispose callback, which’s called Dispose(), you’ll have to add these two lines:
Compare it to your version and tell me if it works! That’s it! You’ve successfully drawn your first texture with Forge. If you’ve faced any issues, please message me using the form below.
Salam everyone! Today I’m introducing a small but powerful library for LibGDX: simple-save-gdx.It helps you serialize and deserialize your game’s data or state classes in a simple, lightweight way. No…
Bismillah, dear readers!I hope you enjoyed the long weekend and managed to recharge. Today we’ll explore building a simple game using simple‑world‑gdx (my lightweight ECS for LibGDX), together with simple‑batch‑gdx…
Bismillah.Today, we’ll take a short detour from Forge and look at something written purely for LibGDX, a little helper library called SimpleBatch. If you’ve used LibGDX for any length of…
Forge is our free and open source game framework for the GoLang programming language. It is feature-rich and constantly improved. We designed Forge to be performant and simple for beginner, its power lies within its ecosystem and community. Forge is lightweight in nature and can be easily extended to fit most of your needs. Write you game logic in your way and let the framework handle compatibility.


